
DIY Chicken Coop Shed for All Climates

Ever considered transforming your disused garden shed into a year-round sanctuary for your chickens? You’ve come to the right place! Today, we’ll delve into how to convert a regular shed into an all-weather chicken coop shed.
| Related Articles: |
Sand for Chicken Coop Bedding: Pros, Cons and Guidelines
Benefits of a Chicken Coop Shed
A chicken coop, also known as a hen house, is a safe and secure living space where your chickens can roost, lay eggs, and simply live their chicken lives.
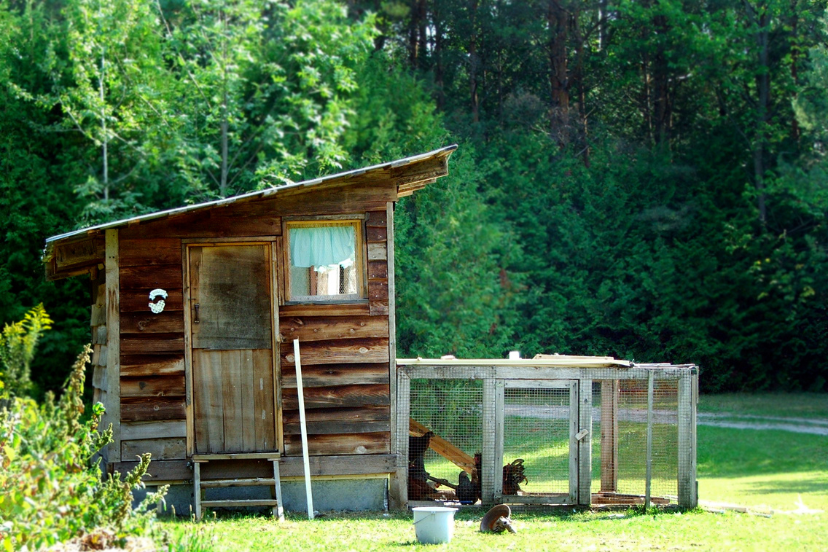
Turning a shed into a chicken coop is both economical and environmentally friendly. It allows you to utilize existing resources while also providing a spacious and comfortable home for your backyard flock.
Repurposing a shed into a chicken coop offers your chickens a safe haven against extreme weather. It is an efficient method of safeguarding them from icy temperatures, which they are particularly vulnerable to.
The coop serves as a secure sanctuary for your chickens at night, keeping predatory threats like foxes and raccoons at bay. The design should focus on robust materials and lock systems, along with a sturdy floor, to prevent any unwelcome intruders.
A cozy, secure coop contributes to the overall happiness and stress-free environment for your chickens, reflecting positively on their egg production. It is crucial to ensure a pleasant and safe laying area for consistent output.
Chickens may not be hygiene-conscious, but they thrive in a clean habitat. Routine coop upkeep is vital to maintain a conducive environment free from pests, diseases, and foul smells. This cleanliness regimen is key to a content and healthy flock.
Adding interactive elements like toys and accessories in your coop can provide mental and physical stimulation for your chickens. It improves their quality of life, keeping them active and entertained.
Having a dedicated coop close to your home offers convenience in daily chores like cleaning, feeding, and egg collection. It also allows you to closely monitor their health and well-being, enabling you to promptly address any concerns, thus ensuring their safety.
Choosing the Right Chicken Coop Shed
Structurally Sound and Well-built
Structural soundness is crucial for the shed you choose. The last thing you want is a chicken coop that’s susceptible to collapsing or unable to withstand weather conditions. Look for signs of structural damage like rotting wood, rusted metal, or a sagging roof. These could be indications that the shed may not be sturdy enough for a coop conversion. Also, ensure the shed is watertight – you don’t want rain or snow making its way into your coop and making your chickens uncomfortable or even sick.
The material of the shed is another critical consideration. Sheds can be made from a variety of materials, but the most common ones are wood and metal. Wooden sheds offer a traditional aesthetic and are relatively easy to modify, but they may require additional measures to protect against pests or rot. Metal sheds, on the other hand, can be more durable and resistant to pests. However, they can also get very hot or cold depending on the weather, so consider adding insulation to regulate the temperature.
Easy-to-clean
Maintaining cleanliness in your chicken coop is crucial for the health and happiness of your chickens. Therefore, choose a shed made from material that is easy to clean. Materials that can be easily hosed down or wiped clean are preferred. Remember, a clean coop reduces the chance of diseases spreading amongst your flock, and also helps keep the coop smelling fresh.
Size of the Shed
Ensure the shed is spacious enough for your chickens. The general rule is to provide 2-3 square feet of space per chicken inside the coop. But also, consider the height of the shed. Chickens like to roost off the ground at night, so the shed should be tall enough to accommodate roosting bars.
Lighting and Ventilation
The shed should have enough windows or other openings to ensure good ventilation and natural lighting. If it doesn’t, you might need to modify the shed to add more.
In conclusion, the right shed for your chicken coop conversion is one that is structurally sound, made of durable and easy-to-clean material, has enough space for your flock, and can provide them with adequate lighting and ventilation. Choosing the right shed might take time and careful consideration, but it will pay off in the long run when you see your chickens thriving in their new home.
Roosting Considerations
Roosting is essentially how chickens sleep. They prefer to roost off the ground to keep away from potential predators and bugs. Hence, the shed you choose to convert into a chicken coop should be tall enough to accommodate roosting bars.
Roosting bars or perches are typically made of sturdy wood. They should be at least 2-3 inches wide and rounded at the edges. This allows chickens to comfortably wrap their toes around the bar and sleep securely.
As for the placement, roosting bars should be positioned higher than the nesting boxes, since chickens instinctively choose the highest perch to sleep. However, ensure they’re not too high to avoid injuries when the chickens jump down.
Each chicken should have about 8-10 inches of perch space. And remember to leave enough space between each perch to prevent droppings from falling on the chickens below.
Nesting Box Considerations
The nesting box is where your hens will lay their eggs. Each nesting box should be spacious enough for a hen to comfortably sit in, typically around 12x12x12 inches.
You should have one nesting box for every 3-4 hens. Too many boxes can lead to hens using them for sleeping, which you want to avoid since they might soil the box.
Place nesting boxes in a darker, quiet part of the coop. Chickens prefer a quiet, private place to lay their eggs. And a darker spot discourages them from sleeping or spending too much time in the box, reducing the chances of the eggs getting dirty. Fill the nesting boxes with a comfortable layer of straw or shavings. This not only makes the box more comfortable but also helps protect the eggs from cracking.
Ensuring all elements are appropriately designed and positioned within your converted chicken coop will greatly contribute to the happiness and well-being of your flock.
Converting a Shed into a Chicken Coop
Here is a comprehensive, step-by-step guide to converting a shed into a chicken coop:
1. Cleaning and Repairing the Shed
The first step in converting your shed into a chicken coop is cleaning and repair. You’ll want to ensure the space is free from debris, dust, and pests before your chickens move in.
- Thoroughly sweep and clean the inside of the shed.
- Use a mild, non-toxic cleaner to disinfect the shed’s surfaces.
- Check for any necessary repairs – this could include fixing broken windows, patching holes in the walls or roof, or reinforcing shaky structures.
- Apply a pest-proofing solution to the shed, focusing on areas where pests might enter, like cracks, doors, and windows.
2. Insulating the Shed
Insulation is a crucial step to ensure the coop stays warm in the winter and cool in the summer.
- Decide on your insulation material. Avoid materials that harbor mites or mold. Fiberglass insulation, while effective, may not be the best choice as chickens can peck at it.
- Fit the insulation between the frame studs and then cover with plywood or another material to prevent chickens from accessing it.
- Make sure to also insulate the roof of the shed for maximum temperature regulation.
3. Adding Ventilation
Proper ventilation is critical for your chickens’ health, reducing moisture and ammonia buildup and maintaining temperature.
- Add vents or windows if they’re not already present in the shed. The size and number depend on the size of your shed, but a rule of thumb is that the combined area of all openings should be about one-fifth of the coop’s floor area.
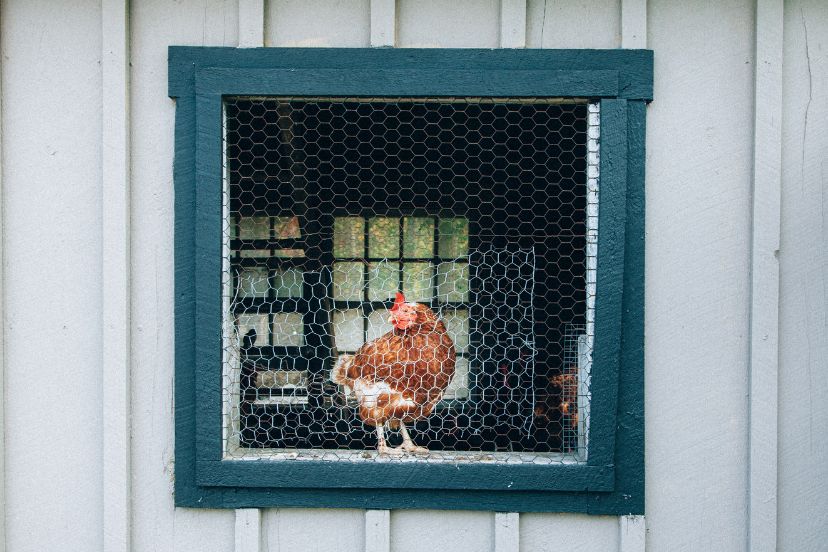
- Ensure ventilation points are covered with chicken wire or mesh to keep predators out.
- Remember, while ventilation is important, drafts can be harmful. Make sure your chickens aren’t directly exposed to wind.
4. Designing the Interior
This step involves making the shed a comfortable, homely environment for your chickens.
- Install roosting bars. Ensure each bird has about 8-10 inches of roosting space and that the roosts are positioned higher than the nesting boxes.
- Set up nesting boxes. You’ll typically need one box for every 3-4 hens. Each box should be about 12x12x12 inches and filled with a comfortable layer of straw or shavings.
- Consider adding a droppings board beneath the roosting bars to collect droppings and make cleaning easier.
5. Predator Protection and Accessibility
The final step is ensuring the coop is secure and accessible.
- Predator-proof the coop. Secure all openings with predator-resistant latches, and consider burying wire mesh around the coop to prevent digging predators.
- Install doors or hatches for easy access to the interior of the coop for cleaning, egg collection, and chicken access.
Converting a shed into a chicken coop can be a rewarding project when done correctly. With thorough cleaning and repair, insulation, ventilation, and proper interior design, your shed will transform into a comfortable and safe haven for your flock. Remember, regular maintenance is key to keeping your coop in good condition for years to come.
Maintaining Your Chicken Coop Shed
Maintaining your newly converted chicken coop shed is not just essential for your chickens’ health but also for the longevity of the coop itself. Here are some important factors to consider:
Regular Cleaning
Consistent cleaning is one of the most critical aspects of coop maintenance. Chickens are messy creatures, and their coop can quickly accumulate droppings, feathers, and leftover food. Regularly removing these waste materials helps prevent diseases and pests.
- Remove old bedding and replace it with fresh, dry bedding. Straw or wood shavings are great choices.
- Clean and refill the feeders and waterers. This helps prevent mold and bacteria buildup.
- Once or twice a year, do a deep clean. This involves completely emptying the coop, scrubbing down all surfaces, and letting it dry before adding new bedding.
Pest and Predator Check
Chickens attract various pests like mites, lice, and rodents. Regular checks help catch these early, before they become a serious issue.
- Examine your chickens regularly for signs of mites and lice.
- Keep an eye out for signs of rodent activity like droppings or gnawed areas.
- Make sure all predator-proofing measures like mesh, latches, and fences are in good condition.
Damage Repair
The coop is exposed to the elements and regular wear and tear. Regularly check for any damages and repair them promptly to keep your coop sturdy and secure.
- Check for any loose or rotten boards, broken windows, or holes in the walls or roof.
- Make sure the coop’s door and any other openings close securely.
- Regularly inspect the integrity of your chicken wire or mesh for any potential breach.
Regular maintenance may seem like a lot of work, but it’s the key to keeping your chickens healthy and happy. Plus, it ensures your shed-turned-coop remains a sturdy, safe, and efficient home for your flock for years to come.
FAQs
How big should my shed be for a chicken coop conversion? This depends on the size of your flock. As a rule of thumb, each chicken needs about 2-3 square feet of space inside the coop.
What material should the shed be made of for a coop conversion? Sheds made of durable, easy-to-clean materials like wood or metal are ideal for coop conversions.
How often should I clean the chicken coop shed? Ideally, a quick clean should be done weekly with a deeper clean every few months.
How can I predator-proof my chicken coop shed? Secure all doors and windows, use predator-proof latches, and bury wire mesh around the coop to prevent digging.
Can I add a run to my chicken coop shed? Yes, adding a run can provide your chickens with more space to roam while keeping them safe from predators.


